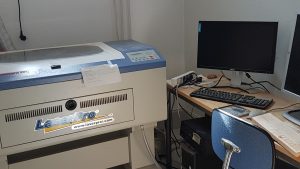
GCC LaserPro Mercury I – Laser engraver conversion for Ruida RDC6445G and LightBurn DSP
(old instructions below)
EDITOR’S MESSAGE: I DO NOT KNOW WHAT HAS BEEN DONE BUT THIS MACHINE NOW WORKS REALLY WELL 🙂
We are moving forward to upgrade our working horse for the Ruida RDC6445G controller with Lightburn DSP operating software.
This page will be updated during the project..
Parts acquired:
Ruida RDC6445G – laser controller (link for manual below)
DG4S-08020 servo drive – 2pcs (link for manual below)
Differential line driver – 2pcs (link for manual below)
DM556 Micro step driver (link for manual below)
Mean Well LRS-350-24 – 24V Power Supply (link for manual below)
………..
Other useful documentation
Mercury I – User manual:
SYNRAD J48-2S-SGC – 25W RF-laser tube manual:

The laser cutter is a GCC LaserPro Mercury I equipped with 25W RF stimulated CO2 laser. The working area is 635mm × 458mm. The laser is capable of engraving and cutting paper, cardboard, leather, wood, plywood (6mm) and acrylic (10mm). Also some other soft materials can be used.
The maximum engraving speed is 1066 mm/sec. When engraving an A4 size square with 250dpi at full speed, it takes about 18 minutes to complete
Preparations
- You need to have qualification for the cutter, ask someone for help
- Make sure the fume exhaust is routed outside and the fan on
- Make sure you are not cutting or engraving material that is on the list of forbidden materials. (PVC, carbon fibre, metal ..)
- If your material is neither on the list of forbidden nor on the list of allowed materials, do some research first – make sure it is suitable for cutting
- Do not look at the invisible laser as it is not good for you – use the camera
Safety
Never cut/engrave:
- poly-carbonate (fumes bad for humans and residue bad for cutter)
- carbon fibre (not good)
- glass fibre (not good)
- ABS (fumes bad for humans)
- glass (glass dust bad for humans and not good for cutter)
- metal (reflections bad for humans & cutter)
- PVC (fumes kill humans)
- Aaltopahvi / corrugated cardboard (cathes fire very easily)
Do not look at the invisible laser beam!
Workflow
- Start CorelDRAW
- Draw or open the graphic you want to cut/engrave
- Hint: If an SVG file doesn’t show up properly, open it in InkScape and copy to CorelDRAW
- Hint: some file formats cannot be opened directly on CorelDraw, but can be imported from File –> Import (CTRL+I)
- Hint: Open preferences (CTRL+J), select Grid from the menu on the left, set grid to suitable size, check Show Grid and Snap to Grid. Lining up objects just became a lot easier!
- Hint: Drag guidelines from the rulers to mark the material boundaries
- Laser will engrave everything else but hairline vector lines
- Draw or open the graphic you want to cut/engrave
- Start the laser
- Turn on main switch from the extension cord
- Should turn on exhaust fan (plug connected?)
- Turn on laser cutter (switch at right hand side, close to back side)
- If laser is complaining Y-axis error
- Turn off laser
- Move Y axis to front of machine by hand
- Turn on laser
- In the initialization phase the table will move 50 mm down
- If laser is complaining Y-axis error
- Put your material into the laser in the top left corner
- Press start/stop from the control panel
- on display it will show “stop”
- move the head on top of the material so that the focus hole in on the material (NOTE! the cutter surface is badly warped. Use highest position.)
- put the focus calibration tool (60mm bolt) into the hole
- use the up/down buttons to bring the material to just touch the focus tool
- focus is now correct for the used lens
- Press start/stop from the control panel
- the panel display should resemble copier display on standby
- Turn on main switch from the extension cord
- Back to CorelDRAW
- From menu Print..
- Printer properties -> Pens
- Different colors on drawing can be used to set different settings for laser
- speed/power to distinguish between cutting and engraving
- check suitable speed/power settings from the list of allowed materials
- Printer properties -> Pens
- From menu Print..
- Never leave laser unattended – risk of fire
- Turn off laser
- Turn off main switch in the extension cord
- If you found a new suitable material that is not on the list, please add it along with suitable settings!
The Mercury acts as a regular printer on the Windows XP (32bit) computer. The settings of laser are controlled via different pen colors in the printer driver.
Mercury User Manual (PDF)
Engraving
Laser is able to engrave pretty much any bitmap you can open on the computer. Partially transparent PNGs cause crashing, hence it is strongly recommended to change transparent parts to white.
Cutting
In order to cut you need to have a vector graphic with thinnest lines. Too thick of a line is considered as engraving job. When cutting the speeds are extremely low, around 1% mark and power is full 100%.
